Showing posts with label recipe. Show all posts

Monday, June 28, 2010

Fancy Food Show

Pastry Girl Cakes attended the Fancy Food Show at the Jacob Javits Center in Manhattan today and we got to see (and taste) amazing food and innovative ingredients for cooking and baking. Since we only use the highest quality ingredients in our pastries, we're always on the hunt for new and delicious products.

Today, we sampled artisan oils that enhance the flavor of baked goods the way extracts and powders do. La Tourangelle is a company that specializes in these oils and we sampled their yummy Roasted Pistachio Oil and biscotti that was infused with it.

Here are instructions for La Tourangelle's Roasted Pistachio Oil White Chocolate Biscotti

Ingredients
3 Tbsp. La Tourangelle
Roasted Pistachio Oil
2 cup Toasted Pistachios,
salted or unsalted—rolled in flour
i cup White Chocolate Chips
2 Tbsp. Unsalted Butter,
room temperature
1 cup Sugar
1/2 Tbsp. Baking Powder
1/4 tsp. kosher salt
2 Large Eggs
2 cups All-Purpose Flour (plus
a Tbsp. for the pistachios)
1/2 Tbsp. Vanilla Extract
1 Tbsp. Lemon Zest

Instructions

In a blender or food processor, mix the sugar, Pistachio oil and butter. Gradually
add the eggs and blend, then gradually add the flour, baking powder and kosher
salt. Take the toasted pistachios and roll them in a pinch of flour. Now mix in
the lemon zest, vanilla, white chocolate chips & floured pistachios and blend for
another minute or two until the dough is brought together. You may have to
work it with your hands to bring it all together into a ball of dough with the nuts
and chips and then form it into four equal size logs of dough and place into the
refrigerator wrapped in plastic wrap for at least an hour.

Heat your oven to 35O° and then place the dough logs onto greased cookie sheets
and leave them some space to spread out and bake for 2O—25 minutes until
golden brown. Remove them from the oven once browned and let cool slightly.
Carefully move the cooled, baked logs onto a cutting board and slice into 1 inch
diagonal slices while still warm. Using a spatula pick up the delicate slices and
place them back on the baking sheet and bake for another 5—10 minutes. Remove
from oven and cool. Store in an airtight container up to one week.


Wednesday, June 23, 2010

Grilled Pound Cake

With the temperatures rising, everyone is less inclined to leave their oven on to bake desserts. The next time you're firing up the grill for a summer BBQ, throw some pieces of sliced pound cake on there for a quick and easy treat.

Directions:

Slice pound cake (homemade or store bought) and lightly brush each side with butter.

Cook the pound cake until lightly toasted

Serve with ice cream and fresh, summer fruit!

Photo courtesy of www.sizzleonthegrill.com.

Thursday, April 22, 2010

Mascarpone Frosting


This past weekend was my Aunt Kathy's birthday and I made her the same cake she's been requesting for three years in a row. Rich chocolate cake with alternating layers of raspberry preserves and ganache. The cake is covered with a mascarpone frosting that I got from Martha Stewart's Baking Handbook.

Mascarpone is a delicious, soft dessert cheese that is often paired with fruit or chocolate. If you can't find it in your regular supermarket, try a specialty market or Whole Foods and look for it in the refrigerated section. I love using the cheese in a frosting because it's not too sweet and it allows the complementary flavors to shine. Here's the recipe I used:

Mascarpone Frosting

Ingredients

heavy cream 1 1/4 cup
confectioner's sugar 1/2 cup
mascarpone cheese 1 lb

Directions

Combine all of the ingredients in your KitchenAid and whip until it comes to a spreadable consistency. Use immediately!


My notes:


- Martha suggests using the paddle attachment but I found the whisk attachment whipped the frosting quicker and produced a more desirable consistency.

- Martha also says to be careful not to overwhip but I have found that overwhipping can actually help make the frosting more spreadable (as opposed to being too soupy).

- I have made this frosting several times now and have used it underwhipped and slightly overerwhipped. If you're traveling with the cake I suggest overwhipping (until it looks like whipped cream) otherwise you'll have a mess.

- The frosting doesn't spread as easily as buttercream so I recommend crumb coating with vanilla buttercream before applying the frosting to ensure you don't have visible crumbs.


Thursday, April 8, 2010

Sour Cream Coffee Cake Recipe


Coffee cake is probably the most popular and most requested cake at bakeries all around the world. A couple of years ago, I got a super delicious recipe for a Sour Cream Coffee Cake from an issue of Fine Cooking.

The recipe comes from baking goddess Carole Walter and it's definitely the pastry that garners the most compliments when I make it! I use a different streusel topping and slightly modified version of the ripple inside the cake than what the original recipes call for.

Sour Cream Coffee Cake

Ingredients

cake flour 3 cups

baking powder 1 1/2 tsp

baking soda 1 tsp

salt 3/4 tsp

butter, slightly soft 10 ounces

superfine sugar 1 2/3 cups

eggs 4

vanilla 2 tsp

sour cream 16 ounces

1. Combine the cake flour, baking powder, baking soda and salt.

2. Beat the butter in your Kitchen Aid until smooth.

3. Add sugar to butter gradually.

4. Add eggs and vanilla.

5. Add flour mixture and sour cream gradually, beginning and ending with the flour mixture. You should add the flour mixture four times and the sour cream three times.

Chocolate Ripple

semi-sweet chocolate 6 ounces

sugar 3 tbs

brown sugar 3 tbs

cocoa powder 3 tbs


Directions

Combine all the ingredients in a food processor and pulse until blended.

Streusel

Ingredients

light brown sugar 1 1/8 cups
all-purpose flour 3/4 cup
cinnamon 1/2 Tbs plus 1/2 a tsp
salt 1/4 tsp
cold butter 2 1/4 oz

Directions

Combine ingredients in KitchenAid and mix until it is has the consistency of grated parmesan cheese.

How to assemble the cake:

1. Preheat the oven to 350 degrees.

2. Grease whatever pan you choose to bake in.

3. Whether you're using a regular cake pan, tube pan or anything else, you add a little bit of the batter into the pan (or wrapper), then the ripple ingredients, then more batter, more ripple and then the remaining batter.

4. Take a butter knife and put it into the cake and swirl it around in a circle so the ripple makes a pretty pattern when you cut into it.

5. Generously apply the streusel to the cake and press down.

6. Bake until the cake springs back when you touch it (the streusel will part as it bakes and you'll be able to touch the cake). This cake usually takes about 45 minutes to bake (20 if you bake them as cupcakes).

Another reason this cake is so great is because you can bake it in a number of different ways. The recipe tells you to bake it in a 10 inch tube pan with a removable bottom but I have also made it in cupcake wrappers, mini loaf pans and sheet cakes to be cut into individual squares. In the picture above, I added chocolate chips on top of the streusel before I baked it.

Thursday, April 1, 2010

Coconut Macaroons


Macaroons can be found all over supermarkets this time of year, but very few actually taste good. I learned this recipe for coconut macaroons at a bakery I used to work at and it always gets rave reviews.

Ingredients

Shredded Coconut - one 14 oz bag
Vanilla extract - 2 tsp
Almond extract - 1 ½ tsp
Egg white - 1
Condensed milk - just add to moisten and help the ingredients stick together (use your judgment!)

Directions

1. Preheat oven to 325 degrees.

2. Combine all of the ingredients, except for the condensed milk, in a bowl. Mix with your hands.

3. Add the milk until the coconut sticks together. (Don't make it too wet.)

4. We used to mold them in round cookie cutters (see picture above), but you can just bake them as small clumps if you don’t have cutters.

5. Bake until edges are lightly golden (5-10 minutes depending on your oven).

Pastry Girl Cakes Spin: dip the baked macaroon in melted chocolate and let cool before serving.

Thursday, March 25, 2010

Cookies & Cream Frosting Recipe


We took the recipe for a classic icebox cake one step further to create this yummy cookies & cream frosting. We only use this frosting for cupcakes (usually chocolate but it works with a variety of flavors). The frosting is light and airy and tastes just like cookies & cream ice cream.

Ingredients

1 quart heavy cream
4 oz granulated sugar
1 tbs vanilla
1 box of chocolate wafers

Directions

Begin whipping the cream and vanilla on your KitchenAid with the whisk attachment. Gradually add the sugar and continue whipping until the cream no longer looks liquid. Don’t overwhip!

Take the bowl off of the KitchenAid and add the whole box of cookies to the whipped cream. Make sure the cookies are submerged. Put the mixture into a Tupperware and let sit in the refrigerator for at least 6 hours or overnight.

When you open the Tupperware the cookies will be super soft and the mixture will be easily spreadable for a cake or cupcakes. I don’t recommend trying to pipe this because the large cookie bits clog the tip!

Enjoy!!!

*For a more waist-friendly recipe use cool whip instead of heavy cream.*

Thursday, March 11, 2010

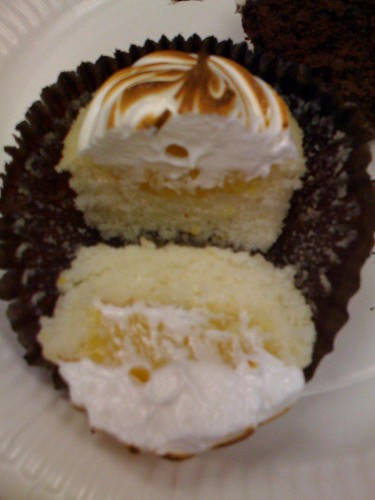
Lemon Meringue Cupcakes

Spring is almost here and it’s definitely being felt in NYC! Like clothes, desserts can be seasonal and nothing says springtime like lemon meringue. About two years ago, we created a lemon meringue cupcake that is the perfect combination of sweet and tart. We’re including our recipe for that cupcake so you can recreate the delicious treat for your next outdoor event!


Lemon-Scented White Cake (makes 24 cupcakes)


Ingredients


10 oz. cake flour
1 Tbs. baking powder
½ tsp. salt
4 oz. unsalted butter (half a stick)
12 oz. granulated sugar
2 tsp. lemon zest
½ tsp. lemon extract
10 oz. cups whole milk
4 egg whites


Instructions


1. Add cake flour, baking powder and salt in a bowl and set aside.
2. Beat butter and sugar in large mixing bowl until fluffy.
3. Add lemon zest and lemon extract and mix until incorporated.
4. Combine eggs and milk together.
5. Alternate adding the dry and wet ingredients to butter and sugar mixture, starting with dry and ending with wet.
6. Add batter to cupcake liners and bake at 350o for 18-20 minutes.
7. After the cupcakes have completely cooled cut out a small well in the top of a cupcake (using a one inch cookie cutter) and fill the cupcake with the lemon curd (recipe below).
8. Pipe the meringue (see recipe below) onto the cupcakes.
9. Pro tip: Use a crème brulee torch on the meringue for a toasted look and taste.


Lemon Curd


Ingredients


4 lemons of lemon zest
6 fluid oz. of strained lemon juice
6 oz. of granulated sugar
4 oz. unsalted butter
8 egg yolks


Instructions


1. Combine zest, juice, sugar and butter in a medium saucepan and bring to a boil over medium heat.
2. Whisk yolks until liquid.
3. Strain zest and beat ¼ of boiling liquid into yolks.
4. Return remaining liquid to boil over low heat.
5. Whisk yolks into boiling liquid and continue whisking until it thickens.
6. Put lemon curd in container and cover with Saran wrap, pressing the Saran against the surface of the curd.
7. Chill until it’s cold and set


Meringue


Ingredients


5 oz. egg whites
10 oz. sugar


Instructions


1. Combine egg whites and sugar in a bowl.
2. Whisk over a double boiler until the sugar is dissolved.
3. Whip the mixture on the Kitchen Aid with the whisk attachment until it becomes fluffy meringue.


Here’s what popular cupcake blog Cupcakes Take the Cake had to say about our lemon meringue cupcake: “The gooeyness and sweet tartness of the lemon combined with the meringue and a light cake = delicious!” We think you’ll feel the same way. Enjoy!